- Label two slides with the patients’ details, EUS/EBUS/FNA and lesion/node and the pass number.
- Place 10 ml of saline solution into a vial labelled with the patient details and EUS/EBUS/FNA and lesion/node.
- Place the saline filled vial into the vial rack to prevent spillages.
General suction advice: (only applicable to EBUS and EUS)
Lymph nodes: suction is not used on lymph nodes on the first pass to prevent excess blood contaminant in the sample. Excess blood results in dilution of the sample and clotting, making ROSE slide preparation difficult and increasing the likelihood of diagnostic cellular material being encapsulated in the clot and not represented on the slides.
Non-nodal entities: lung lesions, pancreatic or adrenal (masses). 5 ml of suction is applied on the first pass.
Suction is increased if the volume of sample is insufficient. If the sample appears in the suction syringe then sampling is immediately stopped for that pass.
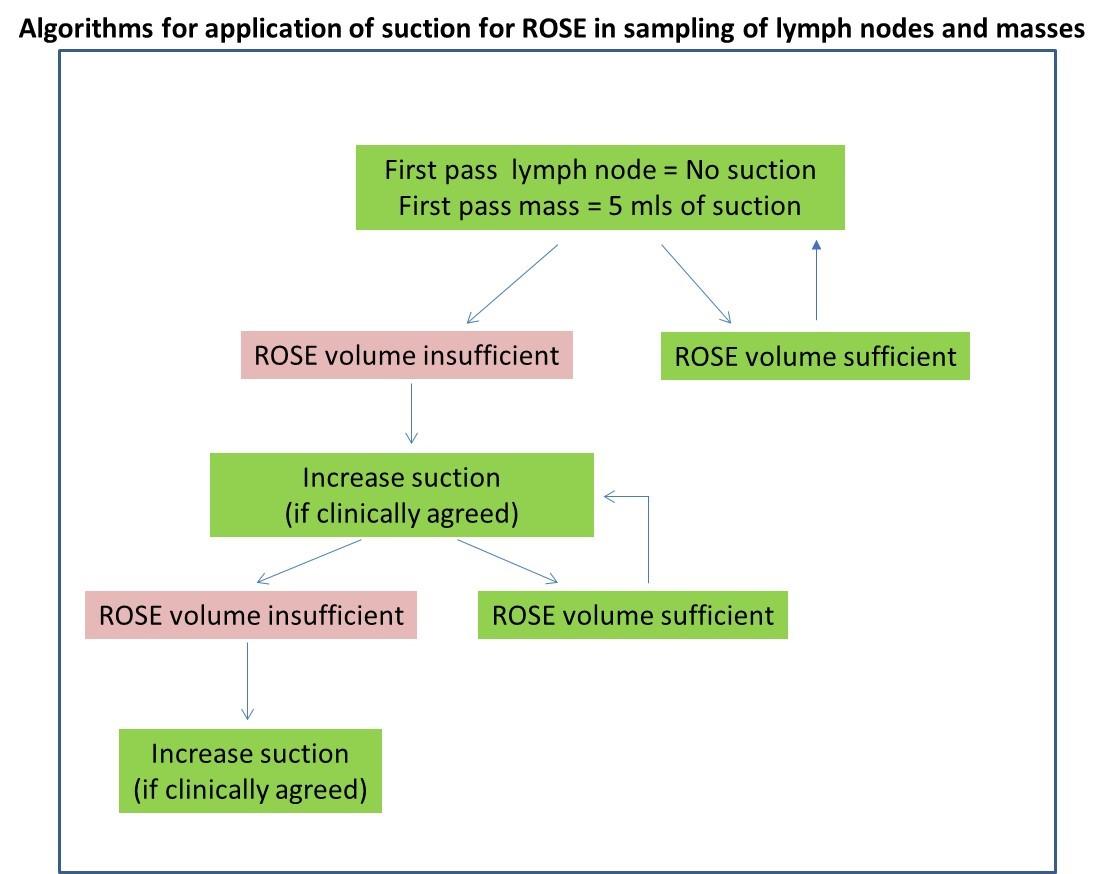
Image first published: Single slide assessment: a highly effective cytological rapid on?site evaluation technique for endobronchial and endoscopic ultrasound?guided fine needle aspiration. Glinski et al. Cytopathology 30, 164–172 (2019).
For Head and Neck or soft tissue FNAs please go to step 11.
- When the clinician is taking the sample, watch to see if blood enters the base of the syringe (if suction has been applied). Shout “Blood” to alert the clinician.
- Once the aspiration has been conducted the endoscopy nurse will hand the sheathed needle and connecting tubing to the individual conducting the ROSE SSA.
- “Needle Out” will be called by the nurse to inform that the needle is about to protrude out of the end of the tubing.
- The individual conducting ROSE SSA confirms that the needle has been exposed by replying “needle out”.
- The needle end is placed into the lid of a vial.
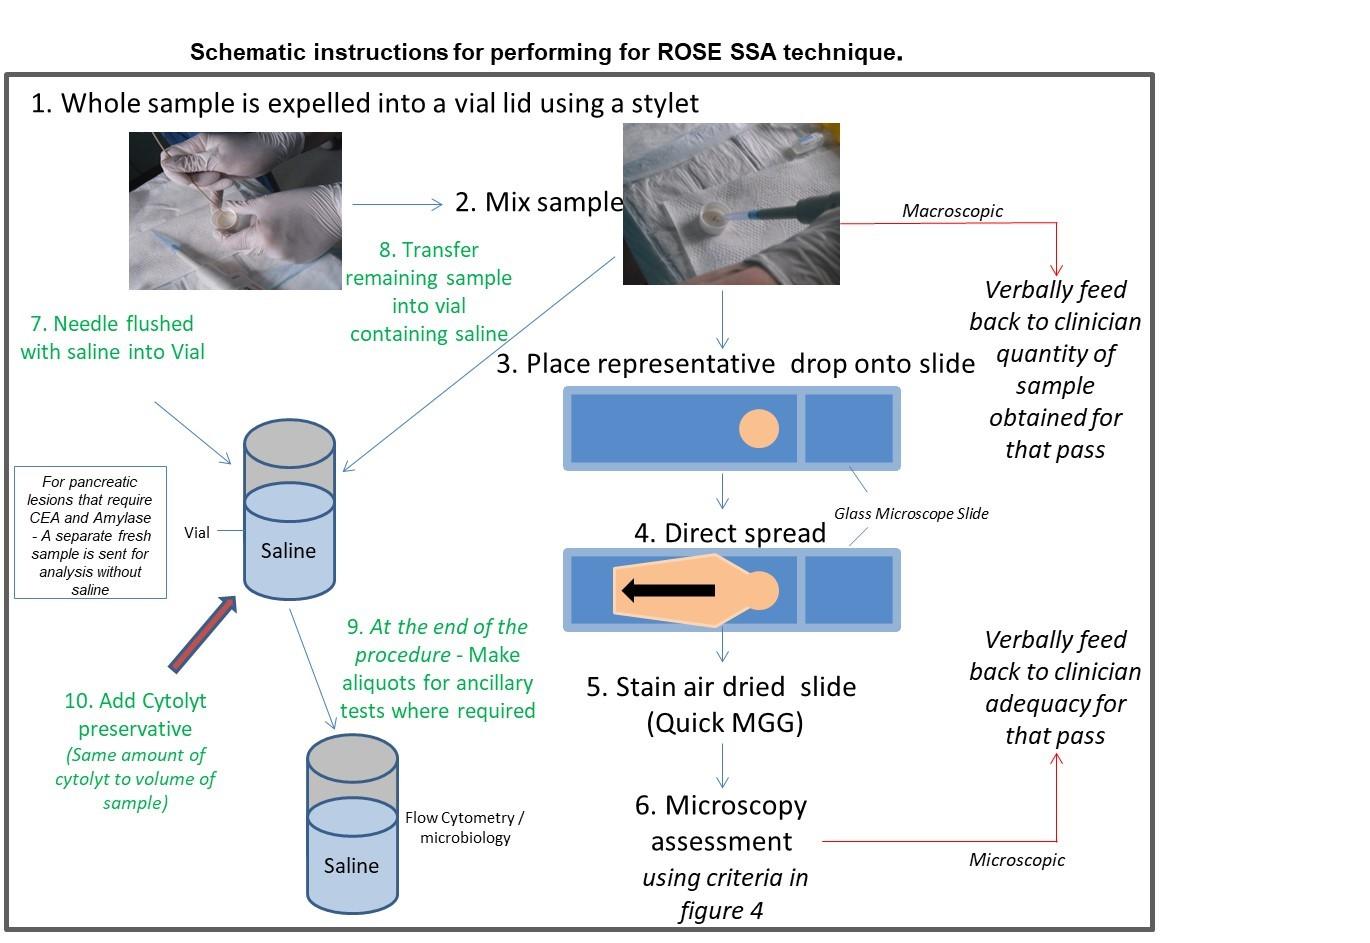
Image first published: Single slide assessment: a highly effective cytological rapid on?site evaluation technique for endobronchial and endoscopic ultrasound?guided fine needle aspiration. Glinski et al. Cytopathology 30, 164–172 (2019).
- The nurse will push all of the sample from the needle and tubing using a guide wire.
- Once the wire has reached the end of the needle or the sample has been expelled, the nurse will flush the tubing through with saline into the labelled vial.
- Mix the cells in the vial lid using an Eppendorf pipette; this is to evenly disperse cells throughout the whole sample. For head and neck and soft tissue FNAs in which only a small amount of sample is in the hub of the needle, syringe the sample straight onto the slide and advise application of suction on the next pass.
- Feedback to the clinician about the amount of sample and if suction may or may not be required.
- Place a small representative drop of the sample onto a slide.
- Pipette saline into the lid of the vial to prevent the sample drying out.
- Directly smear the drop and air dry immediately using the hairdryer on a cool setting.
- Once the sample is air dried place both slides back to back into the methanol solution lift the slides up and down five times.
- Remove the excess methanol by dabbing the bottom of the slides onto a tissue.
- Place the slides into the quick MGG solution one, lift the slides up and down four times and remove the excess stain by dabbing the bottom of the slides onto tissue.
- Place the slides into quick MGG solution two, lift the slides up and down five times and remove the excess stain by dabbing the bottom of the slides onto tissue.
- To reduce sample drop off flood the slide from the top with distilled/deionised water for three seconds or until visual differentiation has occurred.
- Review the slides under the microscope and apply the adequacy criteria appropriate for the lesion sampled.
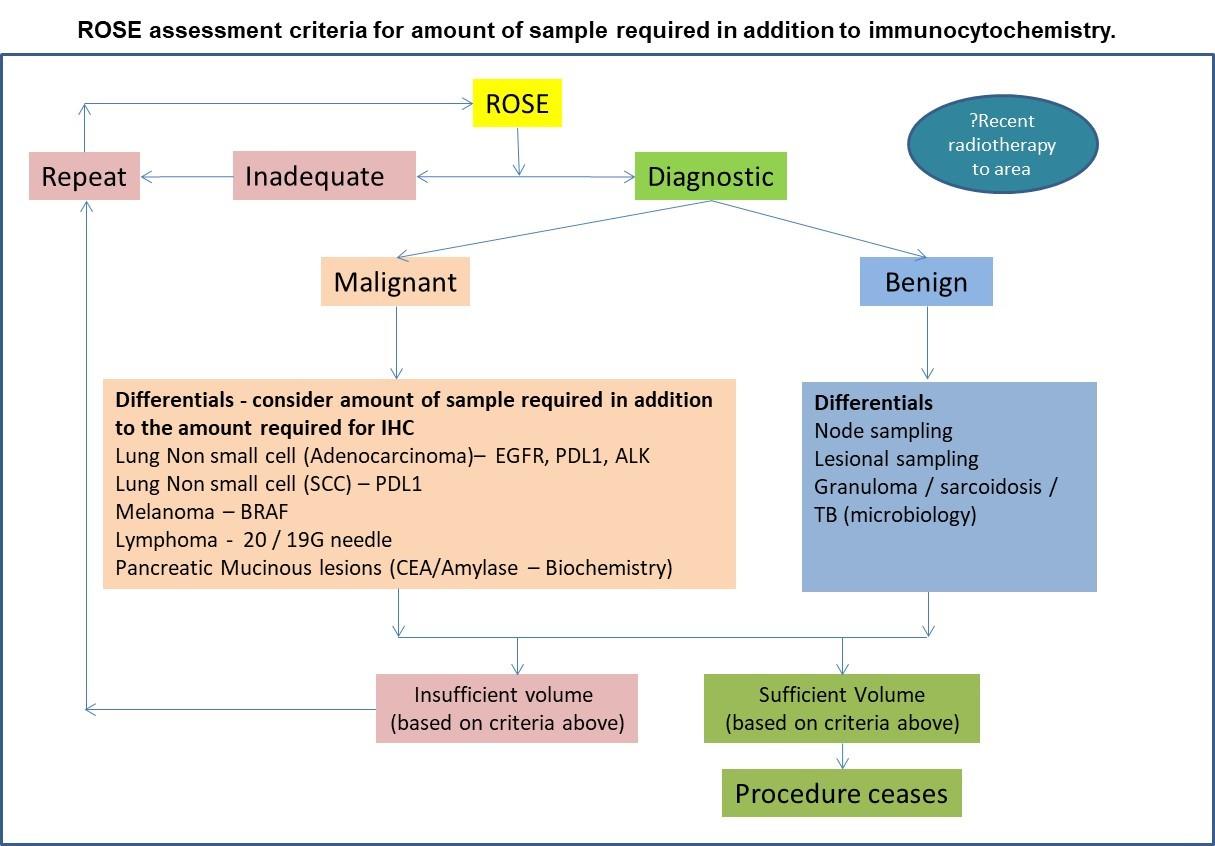
Image first published: Single slide assessment: a highly effective cytological rapid on?site evaluation technique for endobronchial and endoscopic ultrasound?guided fine needle aspiration. Glinski et al. Cytopathology 30, 164–172 (2019).
- In lesions that are clinically suspicious, sampling should continue until diagnostic adequacy is obtained, unless the procedure is stopped for clinical reasons.
- Inform the clinician whether the sample is adequate or not and whether a repeat is required with advice about the amount of suction required. This is based on a combination of the cellularity and adequacy microscopically and the amount material obtain macroscopically; in heavily bloodstained samples with a low cell yield, advise a reduced suction and in cellular samples with a small amount of sampling obtained, advise an increase in suction. Ultimately the decision regarding the suction applied is the responsibility of the clinician.
- Pipette the remainder of the sample from the lid of the vial into the saline filled vial
- Once adequacy (sufficient amount of diagnostic material) have been established, aliquots are created for flow cytometry, microbiology (sarcoid / granulomatous reaction) and biochemistry, where required, prior to adding Cytolyt cell / saline suspension. Samples for CEA and Amylase / 19.9 are fresh samples placed into a sterile vial
- Samples for microbiology are fresh or placed in saline (Split from cytology sample before cytolyt is added.)
- Addition of Cytolyt ensures optimum preservation of the DNA, RNA and antigens.
- Complete the following on the reverse of the request form:
- Number of passes and ROSE interpretation for each pass made
- If there were any issues during the procedure i.e. procedure stopped by clinician, patient unable to tolerate. / Faulty needle
- Preparations required back in the laboratory.
In addition to the ROSE slides made in the endoscopy suite, cases have a liquid based cytology slide created in the laboratory, stained using a Pap stain and an induced clot of the residual material, except where the procedure has been stopped prematurely for clinical reasons, with sparse material obtained. In these cases, the entire residual sample is made into an induced clot to preserve as much material as possible for ICC and molecular testing where required.
The ROSE must consider the following:
Non-small cell carcinomas where insufficient yield was obtained – prepare just a clot (To ensure there is sufficient material for the molecular work up)
Has the patient had the tumour typed previously? Repeat cytology preparations in the laboratory may not be required. The sample can be made into a clot for molecular testing.
When multiple sites are sampled it is crucial that the specifics of the lesion are captured on the form and the on the corresponding vial and slides – For example in EBUS – Node station numbers are used. Involvement of certain stations can lead to different treatment pathways and prognosis. If staging is being conducted – check that the least suspicious node is sampled first to prevent false positives or inform clinician to use a new needle.
- Ensure the clinician has completed and signed the request form.
After the procedure
At the end of the procedure, the individual conducting ROSE SSA must tidy the preparation area, making sure sharps are disposed of appropriately. All re-usable items must be wiped down with a disinfectant wipe before placing back into the clinic box i.e. Eppendorf pipette, hair dryer, microscope, vial rack, pens and pencils, drip tray and surfaces.